Starting a New Inventory
Before you can use the Physical Inventory feature, you must start an inventory in Hospitality Suite. Once the worksheets for a new inventory are created, they can be accessed in Inventory Connect to record the amount on-hand for each item in each storage location. Only when the inventory is closed will the new inventory amounts be updated throughout the system.
Note: You can only have one open inventory at a time. If you have an open inventory, Hospitality Suite will prevent you from creating another open inventory. Closing an open inventory is required before you can create another inventory.
To start a new inventory in Hospitality Suite:
- Click Inventory > Start New. The Start New Inventory dialog box appears.
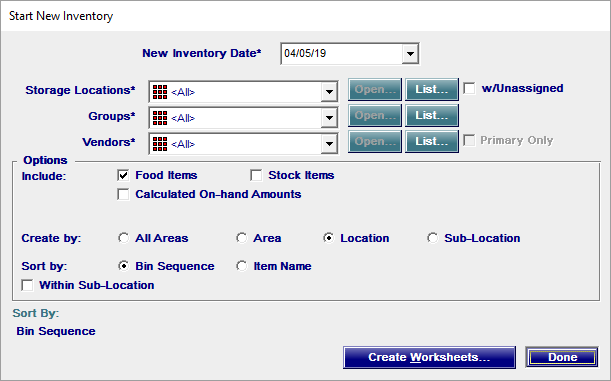
- In the New Inventory Date calendar, select the date of the inventory.
- In the Storage Locations list, select the storage locations you want to inventory.
- If you selected All in the Storage Locations list and want to include items not assigned to a storage location, click to select w/Unassigned.
- In the Groups list, select the groups you want to inventory.
- In the Vendors list, select the vendors you want to inventory.
- If you selected any vendors other than All in the Vendors list and want to only include items that have the selected vendor(s) as the primary vendor, click to select Primary Only.
- To select which items to include:
- If you want to include food items, click to select Food Items.
- If you want to include stock items, click to select Stock Items.
- If you want to include calculated on-hand amounts, click to select Calculated On-Hand Amounts.
- To the right of Create by, click to select Location.
- To select how worksheets will be sorted:
- If you want to sort the items in the worksheet(s) by bin sequence, click to select Bin Sequence.
- If you want to sort the items in the worksheet(s) alphabetically by item name, click to select Item Name.
- If you want to group items in the worksheet(s) by sub-location, click to select Within Sub-Location.
- Click Create Worksheets. The Physical Inventory dialog box appears with all the worksheets created for the inventory.

Caution: Any worksheets created by All Areas or Area are not accessible in Inventory Connect and will be displayed with the label Format Not Supported.
You can now access the created worksheets in the Physical Inventory feature.